Adult Acquired Flat Foot
Tibialis Posterior Dysfunction (TPD)
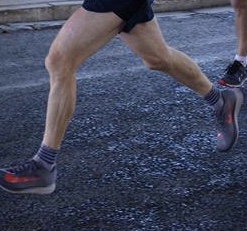
Posterior tibial tendon dysfunction is the most common cause of adult acquired flatfoot. Patients will complain of medial foot pain, weakness, and a slowly progressive foot deformity. A “too many toes” sign may be present and patients will be unable to perform a single heel raise test. The optimal treatment may change based on the progression of deformity and stage of disease. Early identification and prompt initiation of treatment can halt progression of the disease and help avoid surgery.
The tibias posterior muscle originates in the deep legs and its tendon runs behind the ankle and inserts onto the midfoot. It stabilises and raises the arch of the foot and is essential in preparing the foot for forward progression. Damage to the tendon is usually due to repetitive microtrauma. With poor blood supply to the area, the trauma results in progressive degeneration leading to a rigid flatfoot deformity.
Risk Factors for TPD:
- Diabetes – Hypertension
- Obesity – Cortisone use/ local steroid injection
- Previous Surgery – Foot and ankle trauma
- Arthritic conditions
Stages of TPD:
Stage 1: Tendon intact with inflammation but no deformity
Stage 2: Tendon is ruptured or nonfunctional with flatfoot that is passively correctable
Stage 3: non correctable and arthritis evident of the rear foot
Stage 4: Stage 3 with ankle degeneration and gross malalignment
Treatment:
Management of posterior tibial tendon dysfunction relies upon accurate staging of the disease, as both nonoperative and operative treatment options change with each disease stage. Aims of treatment are to relieve pain, improve function, restore alignment by correction of any deformity, and to halt or slow progression of the disease.
Treatment:
A CAM boot can be used to immobilise the foot. If this brings relief, the patient can have shoe inserts or modifications, orthotics or an ankle-foot orthosis (AFO) fitted. Orthotics aims to provide arch support and correct the flexible component of the deformity. Physiotherapy for achilles tendon stretching and tibialis posterior strengthening can also help. In cases that do not respond to conservative therapy or cannot be managed with bracing, surgery may be considered. Surgery involves complex procedures with very long recovery periods.
Exercise Induced Leg Pain

Medial Tibial Stress Syndrome (MTSS) (Shin Splints)
Medial tibial stress syndrome is the most common form of exercise-induced leg pain. It represents a bone stress reaction of the tibia, the major weightbearing bone of the leg. It often results from a rapid increase in level of weight bearing exercise. The pain from MTSS is usually expressed as a dull ache following exercise that may last hours to days, and may even persist during normal activities of daily living. In the early stages of MTSS, pain resolves with rest. However, without rest, pain may transcend previous levels into severe, sharp and persistent symptoms. People affected by MTSS often undertake periods of rest only for pain to recur with resumption of exercise.
The majority of patients suffering from MTSS can be treated conservatively. The mainstay of conservative management of MTSS involves rest from weightbearing activities followed by a gradual return to activity. Proposed adjunctive treatment for MTSS includes heat/ice, massage and extracorporeal shockwave therapy.
Biochemical examination is essential for those with MTSS. It has been shown that those with pronated (flat feet) foot postures are up to three times more likely to experience MTSS. Orthoses are advocated for those exhibiting excessively pronated feet. Treatment of MTSS also include proper footwear and elimination of training errors (see gradual resumption to exercise handout).
More recent evidence suggests that those with MTSS have deficiencies in calf muscle endurance. Consult with your Clinician to assess your level of endurance.
Forefoot Overload
 Forefoot overload is a broad term used to define a group of pathologies of similar origin. Individually the conditions may include:
- Bone stress- where bone is broken down and is at risk of stress response/ stress fracture. This normally occurs at the head of the metatarsal bone.
- Inter metatarsal pathology- including neuromatoma (pathological thickening of the nerve sheath) and bursitis. Clinically these two problems are difficult to distinguish as bursitis may apply pressure to the nerve resulting in symptoms, (shooting pain, burning, numbness and a “full” feeling) similar to a neuroma.
- Synovitis- inflammation of the fluid in the metatarsophalangeal joint.
- Plantar plate pathology- where the plantar ligament attaching the toe to the metatarsal is ruptured or partially severed resulting in subluxation of the toe (and possibly a hammer toe).
- Transverse ligament damage- resulting in splaying of the toes.
From a mechanical perspective, these group of disorders result from mechanical overload. That is, too much repetitive pressure has been applied to this area and the body has not been able to withstand the force. During walking the body is subject to one and a half times your body weight. This increases to up to three times for running and five to six times for sports involving jumping and twisting.
The aim of mechanical treatment is to deflect load from this area. This may be done with footwear alteration and foot orthoses.
It is also important to improve your body’s ability to withstand load. Often those with forefoot overload are exceptionally restricted through the ankle joint. The ankle joint is essentially a hinge joint which allows the extension of the body over feet. When the ankle is restricted in motion, the heel may unweight quickly during gait resulting in weight bearing load to the forefoot. Range of motion can be improved through tissue massage and stretching. As passive stretching can result in a deficit of muscle power, it is suggested that once range of motion is achieved, strength over range of motion is the aim. Strengthening programs or progressive load programs are essential in improving the body’s ability to withstand repetitive weight bearing forces.
Most cases of forefoot overload improve with mechanical measures. In some cases whereby specific tissue is extremely damaged, other treatments may be required. For example neuromatoma may require injection or ablation therapy or in some cases, even surgery. Metatarsal stress may require a period of weight bearing rest in a below knee splint.
Entry strength and mobility for lower limbs for young athletes
Recently Performance Podiatry Geelong spoke to an elite group of young footballers participating at the V-Line Cup in Geelong. Following are the strength and mobility exercises suggested:
- Table Top

- Decline board ankle mobility and lower limb strength

3. Squat
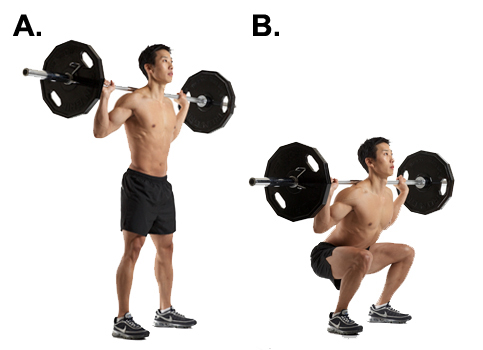
NB. This exercise is to be performed using body weight only to start with.
4. Nordic Hamstring curls

For specific information regarding repetitions/ sets please do not hesitate the clinic.
How to choose the best running shoes
Selecting the best running shoe for you can be a daunting process. The following relates to technical guidelines that may help the process. However, there is not a “one size fits all approach.” Some people may well follow the complete opposite to what is proposed here. For those individuals, they may well be adaptive to their footwear and quite resilient to loading forces (pressure from the ground when running) and injury in general.
- Comfort: Above all factors, footwear must be comfortable. Research suggests that if an individual picks a shoe based on their perceived comfort, they are less likely to get injured. There are many factors (some of which will be discussed in further detail) that can impact comfort. One of the most important factors is “fit.” A good running shoe store can help you to ensure your heel is held firmly in the shoe and your forefoot is not too compressed. Ensuring adequate depth, width and length of your footwear is vital. If your runners are too tight, you may lose the ability to properly move your toes and contract the associated musculature. This can have a detrimental effect on your load capacity (your ability to withstand running forces) and running efficiency in general. When your toes have space and can move without impediment, deep musculature of your legs and feet are able to work more efficiently than if your toes are constricted.
- Alternating footwearAlternating footwear has been shown to decrease injury rates. By using footwear with different features, weight bearing load is varied to the body. For example, increasing the pitch of footwear (higher heel), you may decrease loading through the forefoot and distal leg. Conversely, a lower pitch runner (flatter pitch) may increase the loading of the forefoot. An example of alternating footwear could be: An experienced runner of around 80-100km mileage per week alternates three different types of athletic footwear:
1. Standard 10-12 mm pitch runner chosen based on comfort to perform easy runs on a daily basis
2. Refined footwear of lower pitch and bulk in general- used for key speed sessions
3. Maximalist footwear- cushioned footwear (e.g., Hoka) used for recovery sessions3. Footwear selection based on age
All things being equal, the older you are (very generally speaking!), the less resilient you may be from weight bearing exercise. Good training may counter advancing years.
For older athletes, they are more likely to have adapted to wearing positive heeled (heel elevated in relation to the forefoot) footwear over their lifetime. Additionally, older individuals are more likely to experience stiffness of all components of the musculoskeletal system (calf muscles, achilles tendon etc). This is further exacerbated by a lifetime spent excessively in a flexed position (sitting at work, working on computers).With these factors in mind, it will generally be safer for older athletes to wear footwear with higher pitch (or maximalist footwear). Stiffness and footwear adaption is not set in concrete. Mobility can be improved and footwear options may change based on an individual’s range of motion and resilience to loading.
Younger athletes generally have less history of injury and better mobility. As a result, their musculoskeletal system is able to cope with a greater variation of footwear features. From a personal perspective, I like the concept of more minimalistic footwear to prevent footwear from generating contracture in soft tissue. However, I am very aware of the natural fallacy (the concept that natural technique like barefoot running or minimalistic footwear is best). This approach is flawed as there is not a one size fits all approach.
4. Footwear selection based on mobility
Leg stiffness- If someone has excessive leg stiffness, it is generally excepted (but not necessarily supported by research…. yet!) to wear footwear with higher pitch.
5. Footwear selection based on History of injury
Achilles injury- use higher pitch footwear or footwear with forefoot rocker (e.g. Hoka)
Plantar fascial injury- higher pitch footwear
Forefoot pain-higher pitch or maximalist footwear
knee pain- minimalistic footwear. Minimalistic can help a runner strike beneath their centre of mass which can decrease loading forces through the knee. However, in this case, running assessment is key. It is vital to ensure running cadence and sagittal biomechanics are assessed to ensure decreased knee forces. Low pitch, minimalistic footwear can help but guidance may be required. For example, a runner with degenerative knee issues may also have history of Achilles pain. In this case, the individual may have to choose footwear features which are not entirely assistive of one of the pathologies. Reverting back to perceived comfort may help decide what footwear features the runner ultimately decides on.
6. Footwear selection based on history
Footwear history is an important consideration in deciding what shoe is best for an individual. For instance, if someone has been wearing a shoe with a particular feature like rearfoot support`** for a prolonged period of time (e.g., 10 years) without any injury, it may be unwise to change the type of shoe.
7. Footwear selection based features such as support
Medial support is footwear feature often used to control foot pronation (“rolling in”). Most research does not support the notion of such features reducing injury risk. However, in certain cases, it is accepted that shoes stronger on the medial ( midline side) are vital. For example, in those with tibialis posterior dysfunction, a serious foot and leg pathology, it would be recommended to wear footwear with such supportive features.
One final note. Good footwear alone will not prevent injury. Good training principles focussing on gradual overload, strength and resilience and optimal health are vital.
** Footwear features such as medial support do not always equate to changes in body biomechanics (kinematic and kinetic changes).
Luke Madeley

Tom Ovens, a cyclist on the rise
Background –
Tom is currently working as a Personal Trainer in Geelong as well as studying Exercise and Nutrition Science at Deakin University
Key Race Results-
11th Elite National XCO championships 2015, 1st Surf Coast 3hr 2014, 3rd You Yangs Yowie 99km 2014, 1st place Rd1 National XCO and Criterium Open men December 2014
Sponsors-
Cannondale-ENVE MTB team. SRAM, Bell Helmets, Louis Garneau, Pro4mance, Premax, Rocktape and Swiss Eye sunglasses also support Tom.

Tom Ovens in full flight on single track is a a sight to behold!
Thanks for Chatting with us Tom. What’s your background prior to cycling and what has drawn you to mountain bike racing?
No worries! I started off racing motocross, which I did for nearly 15 years. I started when I was 12 and ended up winning one National championship in 2006 in the under 19 category. From there I moved into the Pro class and had some ok results. It’s very hard to stay competitive in motocross, especially when you have lots of injuries like I did. In fact, injuries are what got me started into cycling! After one of my 3 knee reconstruction’s (the second one I think!) I began doing some road riding for rehab, after a while I began to enjoy it and so I thought I would give mountain biking a go. From there it was a natural progression and I finished up racing motocross at the end of 2012, so I’ve been focusing on MTB (mountain biking) for a bit over 2 1/2 years.
You’ve had a meteoric rise in success for both mountain biking and more recently road cycling. What do you put this success down to?
Because of the motocross background I always found the skills side of things pretty easy. I have never been someone with a naturally large aerobic capacity, but I am good at sticking to a training plan and I enjoy the process of improving my fitness. I would say I am definitely still a work in progress though when it comes to outright fitness but I am getting there!
What are your thoughts on genetics vs training relating to performance?
I’ve thought about this a few times, especially in regards to my study in the field of exercise science. I think there are plenty of people who have huge natural talent, but if you aren’t willing to put in the hard work it won’t be enough to produce results. Sure you will have the odd good race, but over the long term I think someone a little less gifted who is willing to work hard will ultimately succeed. Of course, if you are gifted AND put the time in you will really excel!
In terms of training, what has been the key types of training/ sessions that has resulted in gains in fitness?
My training changes depending on the time of year and when the targeted races are. I am continually working on my weaknesses but as a general rule long base km’s and strength work on the bike is done in the off season or during a break in racing. As the races draw closer the sessions generally shorten up slightly and some intervals are brought in whether it be on hills or flat speed work. I think for me a combination of all these sessions are what improve anyones fitness. For me at the moment I am getting ready for quite a few Cyclocross races which are 60mins long and full gas the whole time. In preparation for that macca has me doing lots of short max and sub max sprint/TT efforts to build up my tolerance to lactate and explosiveness. I recently did another lactate test with Donna Ray and its great to see progression from these types of sessions.
Do you have a favourite interval session? Please give example…
Expanding on the sprint/TT efforts, it might be something like a 5-10 second all out sprint followed by 2 minutes rest x 10 reps, then 10 x 10sec sprint and straight into a 20-60 second TT effort. It varies session to session but they are all aimed at improving that explosive power and repeated efforts. I also quite enjoy doing some motor pacing. I haven’t done heaps of sessions behind the bike but my coach macca has taken me out a few times and done some 5 mins “on” 5 mins “off type sessions. The idea is to sit behind the bike and recover for 5 mins, then pull out to the side and maintain that speed for another 5 mins. Keep in mind that the “recovery” phase is still well over 40-45km/h so its a hard session, but I like the feeling of going fast on the road bike!
What has been the influence of your coach, Craig McCartney? Have other athletes like your team-mate, James Downing, been instrumental in moulding you as an athlete?
Macca has been great for my development as a rider. He has a wealth of knowledge from his riding days as well as working closely with Donna Ray (who is a cycling coach and the VIS and Dan McConnels coach) and its been great to learn form him and have him write my programs each month. I have only known James a relatively short time but I have learnt a great deal from him. He has pretty much been there and done that in every discipline of cycling so its awesome to have him and the Cannondale team in my corner. I would say on the local front Scott Nicholas is someone I really admire as an athlete and just as a great bloke. His achievements in his running career blow my mind and to see him doing so well on the MTB is awesome. I see him and I as opposite ends of the spectrum. He has an amazing engine and came into MTB later in life which required him to lear the skills really quickly (which he has I might add!). I on the other hand, have always had the skill but need to build an engine, the fact that we can cross the finish line at the Otway Odyssey this year with less than a minute between us after nearly 5 hours of racing goes to show just how cool and diverse MTB really is.
How important is technology such as GPS, heart rate and power meters to both training and racing?
I really enjoy all the data when it comes to training, and I think its a necessary tool especially to monitor training load and fatigue/freshness. I use HR all the time and have had a power meter on my road bike for a bit over a year. All my efforts are based off power in terms of training and I alway try to match that to my HR. If my HR is ever low/high compared to power that can be an indicator of many things, good or bad!
Have you tried additional training techniques such as cold thermogenesis, heat training or altitude training?
Not a great deal. I go up to the Victorian alps each year with a bunch of mates to do a training camp, although I wouldn’t say that there are any benefits in terms altitude adaptations in Victoria. I have been involved in a couple of clinical trials on cyclist in hypoxic conditions however, and the results were significant so I am keen to try some more altitude training if the opportunity ever arose.
Thanks for chatting with us Tom. Good luck with your future endeavours.
Not a problem, thanks for giving me the opportunity!
Knee Pain
Knee pain is an all too common complaint in runners. There are many causes for this knee pain but one of the most common injuries is called Anterior Knee Pain (AKP) or patellofemoral pain syndrome (PFPS). This makes up to around 25% of all identified knee injuries in runners. The interesting problem with AKP is that it is a diagnosis made from its only symptom of pain which is usually located around or under the knee cap. This condition is rarely associated with any structural damage.
Historically we used to think that one of the primary causes of AKP was due to the misalignment of the patella during running. Clearly there is an association between tight and overactive structures around the knee that can influence the position of the patella through its movement. Addressing these through a structured stretching program and a course of manual therapy can help. However, more recent research is shedding new light on the most common cause of AKP. Hip weakness and early fatigue during the stance phase of running leads to a valgus or ‘knock knee’ posture and this has shown to be a leading cause of AKP. Simply put, as your foot comes in to contact with the ground the muscles on the outside of your hip must become active to stabilise the pelvis girdle and to stop it tipping forward on the opposite side. If the muscles do not do this then your knee will turn in slightly (genu valgum) to compensate causing a change in the biomechanics and probable pain around your patellar! Studies have shown that by incorporating specific hip abductor strengthening exercises in to a rehabilitation program, not only does the peak hip abduction strength improve but stride-to-stride knee joint variability improves, a reduction in genu valgum is observed during stance phase and most importantly pain is reduced!!!
So what is a good exercise to improve your lateral hip muscles? Well my 2 favourites include the resistance band walk and the lateral shuffle. All you will need to do these exercises is a loop of resistance band and a bit of space. Loop the band around your lower leg or ankles and stand in a half squat position with your feet wide enough apart to feel some strong tension in the band.
- To do the resistance band walk all you do now is walk forward in the half squat position keeping the tension in the band by making sure your feet stay wide apart. Take around 20 steps forward and then 20 steps backwards.
- To do the lateral shuffle, instead of walking forward in the half squat you take a step to the right keeping the half squat and after planting your right foot you move your left foot equal distance to the right. Take around 20 steps in each direction.
There are many more exercises that can help improve your function and running form and so if you would like a comprehensive assessment and rehabilitation program developed using the latest in evidenced based research then please do not hesitate to contact us for an appointment.
Nick Williams
Running Cadence
Recently there has been a shift in focus away from particular foot strike patterns relating to running injuries toward alterations in cadence. While this has been a positive initiative for many runners, foot strike patterns may still have relevance in treating specific injuries. However, altering cadence is something almost anyone can attempt and adapt to. Shifting foot strike patterns can be more difficult.
Cadence refers to a runner’s stride rate. Combining stride rate with stride length gives you your running speed. It has been suggested that a cadence of 180 strides per minute is optimum. However, in practical terms this is not relevant as cadence changes with running speed. For example an elite runner may do an easy run at a cadence of 170 and race a 10 k with a cadence over 200.
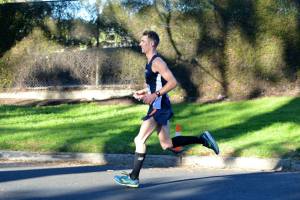 Novice runners tend to run at much lower cadences. Coupled with lower cadences is the tendency to overstride. Overstriding occurs when your foot contacts the ground in front of your centre of mass. This often coincides with heel striking.
So what are the benefits of running with a higher cadence? Research has indicated an increase in cadence can result in a decrease in force applied to the knee (patellofemoral joint) and hip when running. Most agree this is do the foot contacting he ground beneath the body’s centre of mass. The potential downside of this is an increase load to hamstrings and rectus femoris (quadricep) musculature.
To calculate steps/minute, count the number of times one foot strikes the ground for 30 seconds and then multiply this number by 4. Re-test number of times in various situations. If your cadence is consistently low (e.g., less than 160), try increasing your stride rate by 5-10%.
Remember, don’t get caught up in the absolute number relating to cadence. If you are struggling with injury or a novice, it may be worth altering your cadence by a small percentage and see whether it helps.

Improving your breath holds for surfing
So as the summer (yeah I hear you, what summer??) draws on and thoughts turn to the hope of bigger swells and off shore winds for you surfers I thought I’d post a quick article on some basic and easy techniques to improve your breath holds. As an avid spearfisherman and free diver I have often been asked by my surfing friends how I can hold my breath for so long and is there some magic trick I use? In short no – it’s all about training unfortunately!
To start with these are only my thoughts and experiences having spearfished for many years and done a basic freediving course when I was living in the UK….yes we do get in the water over there, and yes it is bloody cold!!
Important!!
Freediving / breath holding training are inherently dangerous and so if you are keen to learn more about improving your breath holds there are some great courses out there that will teach you the skills to do so safely. Remember – NEVER dive or train in the water alone and KNOW YOUR LIMITS!!!
One thing that is brilliant for surfers is training to improve your carbon dioxide tolerance, aka CO2 Training. One of the main things that makes you want to breathe is the build-up of CO2 within your body. If you can train to tolerate CO2 better, you can stay down for longer. The body is designed to have a whole bunch of survival mechanisms and they kick in very early. For example on a static breath hold (just lying there not moving) I get the urge to breathe after about 1:30 minutes, but I can actually hold my breath for over 4 minutes – it’s all about learning to tolerate CO2.
Classic CO2 table
Do this one at home on the bed or lounge in front of the TV – you should not be moving around, just staying still. The idea is to do a few breath holds and to gradually reduce your recovery time. What this does is it gradually builds up your CO2 levels which is your trigger to breathe. In between breath holds you have time to recover and to re-oxygenate, but you’ll still have a build-up of CO2 as this takes longer to breathe off. As you go along, the breath holds should get harder and harder as your CO2 levels build up. Important: The idea of the CO2 table is not to hold your breath for the longest time, but to hold it at about 60% of your max effort and gradually reduce your recovery time. So if you’re capable of a 3 or 3 and a half minute breath hold, I would use 2 minutes as a rough starting point.
A Basic Table:
Breathe for 2 minutes; Hold breath for 2 minutes
Breathe for 1:45; Hold breath for 2 minutes
Breathe for 1:30; Hold breath for 2 minutes
Breathe for 1:15; Hold breath for 2 minutes
Breathe for 1:00; Hold breath for 2 minutes
Breathe for 0:45; Hold breath for 2 minutes
Breathe for 0:30; Hold breath for 2 minutes
Breathe for 0:15; Hold breath for 2 minutes
Apnea Walking
There’s a bunch of different ways of doing this, the way I usually do it is based on counting number of steps rather than time. Start walking at a normal pace. Take a deep breath in and hold it for a certain amount of steps (try around 30 and adjust up or down.) Once completed, breathe for the same amount of steps (e.g. 30) Take another breath and walk again for a set amount of steps (e.g. 30) Breath for 30 steps etc. etc. Do this for a while (10-20 breath holds, or approx. 20 minutes), but make sure you don’t breath hold for too long because if you black out you’ll hurt yourself when you fall……. plus you want to be training high CO2 levels, not low oxygen levels.
CO2 Tables and Apnea walking are pretty good staples for training for a lot of freedivers but there are lots of other training ideas that will help you too; O2 tables – these allow you to cope with low oxygen levels. Anything that teaches you to relax – yoga, Tai Chi and meditation are all good at allowing you to hold your breath longer. Having a good old fashion base fitness is also a must – cycling, rowing, running etc. can all help you achieve this.
Nick Williams
About the Author:
Nick is a passionate physiotherapist with a background in elite Rugby. His focus is evidence based practice for optimal injury recovery and performance.
